the bright-field compound light microscope:
The Bright-field compound light microscope produces an image that is made from light that is transmitted through the specimen on the slide. Many biological specimens are transparent, so staining aids in seeing their structures and morphology. The downside is that the staining process usually kills the cells and you cannot observe any motility.
Light comes in from an internal or external light source, at which point it passes through a condenser lens, where the light is concentrated, illuminating the specimen. The light is bent (refracted) as it passes through the objective lens from the specimen to produce a real image. Once again, the image is magnified as it passes through the ocular lens, where it produces a virtual image that appears below or inside the microscope. On each lens, the amount of magnification it can produce is carved onto the outside. Total magnification of the specimen is calculated by this formula:
TOTAL MAGNIFICATION = MAGNIFICATION OF THE OCULAR LENS (X10) X MAGNIFICATION OF THE OBJECTIVE LENS
Is there a limit to magnification with a light microscope? Yes, there is. In fact, it is around 1300x. The higher the magnification, the more difficult it becomes to maintain clarity of the image. The clarity of the image is referred to as resolution, and the limit of resolution (resolving power) is a measurement of how far part two points need to be in order for the microscope to be able to view them as separate. Resolution improves as resolving power decreases. The best limit of resolution in a light microscope is achieved at around 0.2 micrometers.
The numerical aperture is the measure of the lens's ability to focus light to make an image, and it is also engraved on the lenses. Use of immersion oil between the specimen and objective lens on the 100x lens makes the limit of resolution smaller and improves numerical aperture.
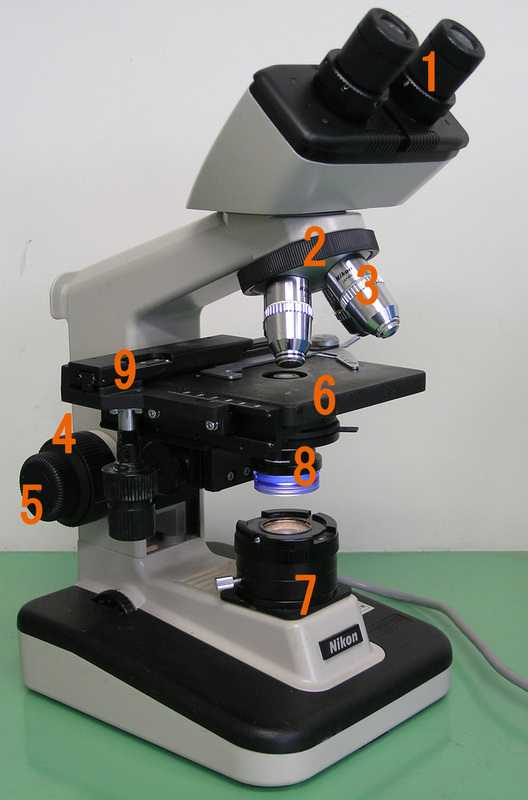
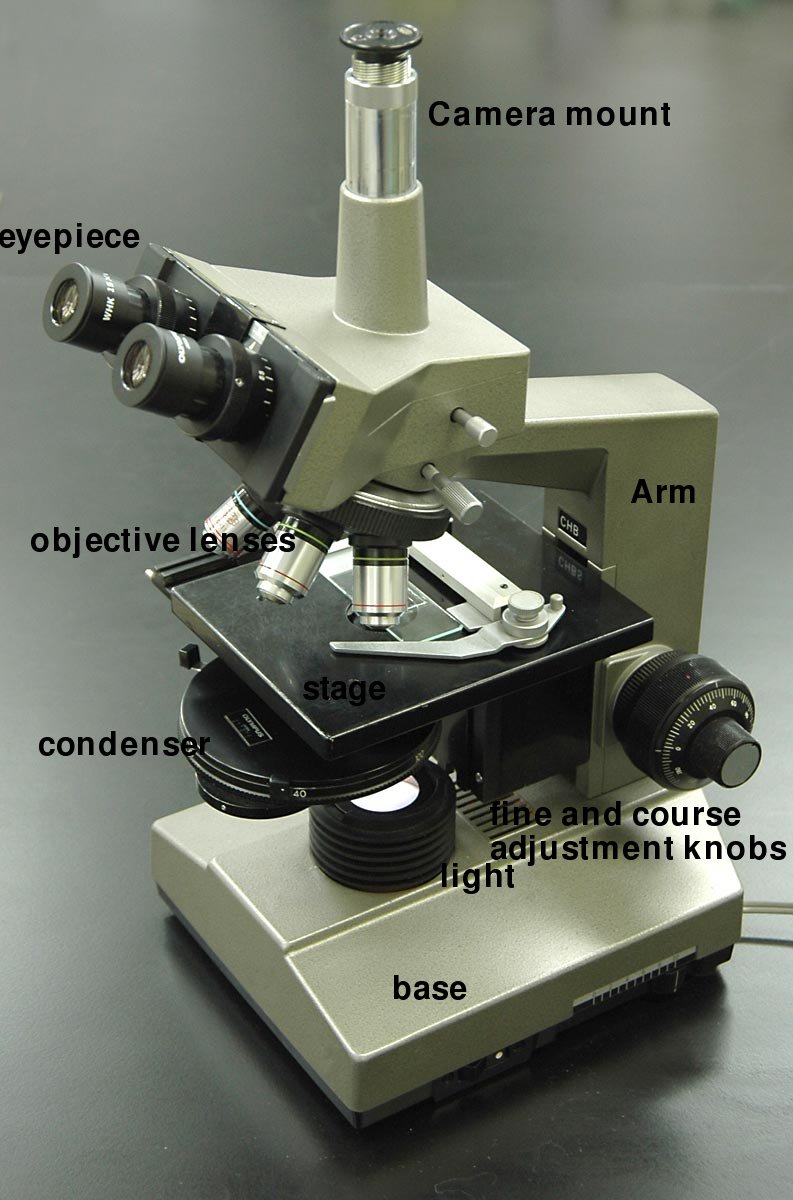
A binocular Bright-field compound light microscope
THE COMPOUND LIGHT MICROSCOPE (OPTICAL):
1. Eyepiece (Ocular Lens)
2. Objective Turet, Revolver, Revolving Nosepiece (Holds Objectives in Place/Turns)
3. Objective Lenses (5x, 10x, 20x, 40x, 100x oil immersion)
4. Coarse Adjustment Focus Knob
5. Fine Adjustment Focus Knob
6. Stage with Stage Clips to Hold the Slide
7. Light Source
8. Diaphragm and Condenser
9. Mechanical Stage
NEVER use any lens EXCEPT the 100x Oil Immersion Objective Lens with oil. Never sweep the other objective lenses through the oil. Clean the microscope after each use so that oil does not clump or seep into the 100x lens or up through to the 40x lens causing cloudiness, poor visibility, or damage. Clean the objective lenses ONLY with soft lens tissue paper, NEVER with Kleenex, paper towels, or anything but lens paper and lens cleaner or lens paper moistened with a little xylol or xylene if the oil-immersion lens becomes gummy or tacky. Immediately remove with a tissue moistened with 95% alcohol. Lenses are expensive and easily scratched and damaged, so treat them with care. The high dry objective (10x) should be used first to scan the area. The 40x objective should be used for wet preparations and O & P wet mounts. The 100x oil immersion lens should NEVER be used dry, and should be used with a drop of immersion oil to look for microbes on a Gram-stain and to quantitate the microbes that are seen on the slide, if any.
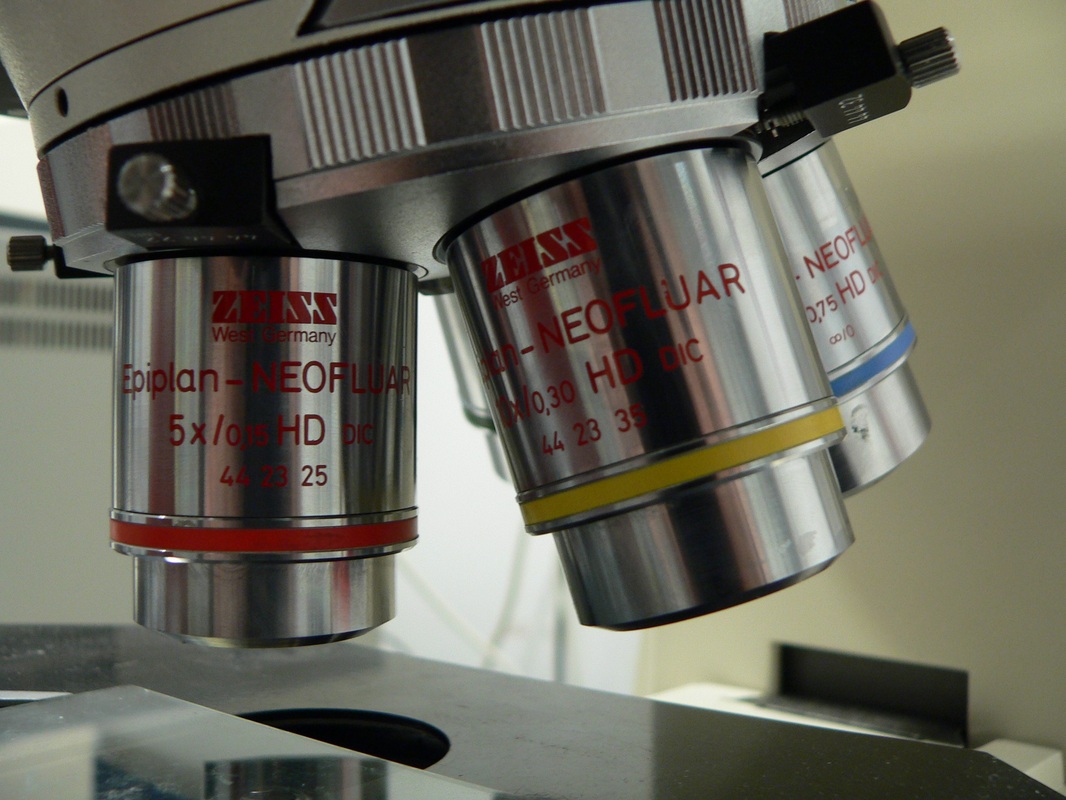
The magnification and the numerical aperture are engraved on each lens.
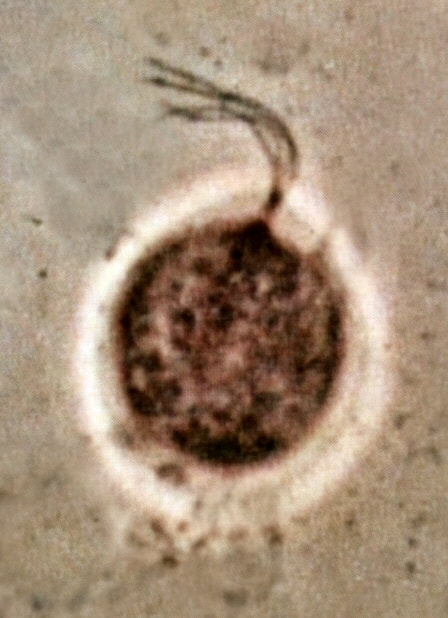
Dark field microscopy:
Dark field microscopy is used to view things like spirilla, spirochetes, like leptospira or B. borrelia. This is a modified light microscope that enables one to view images without staining the cells. A special condenser is used and the light is reflected off the specimen, enters the objective, and the specimen will be lit up against a dark background, often with better resolution than the light microscope.
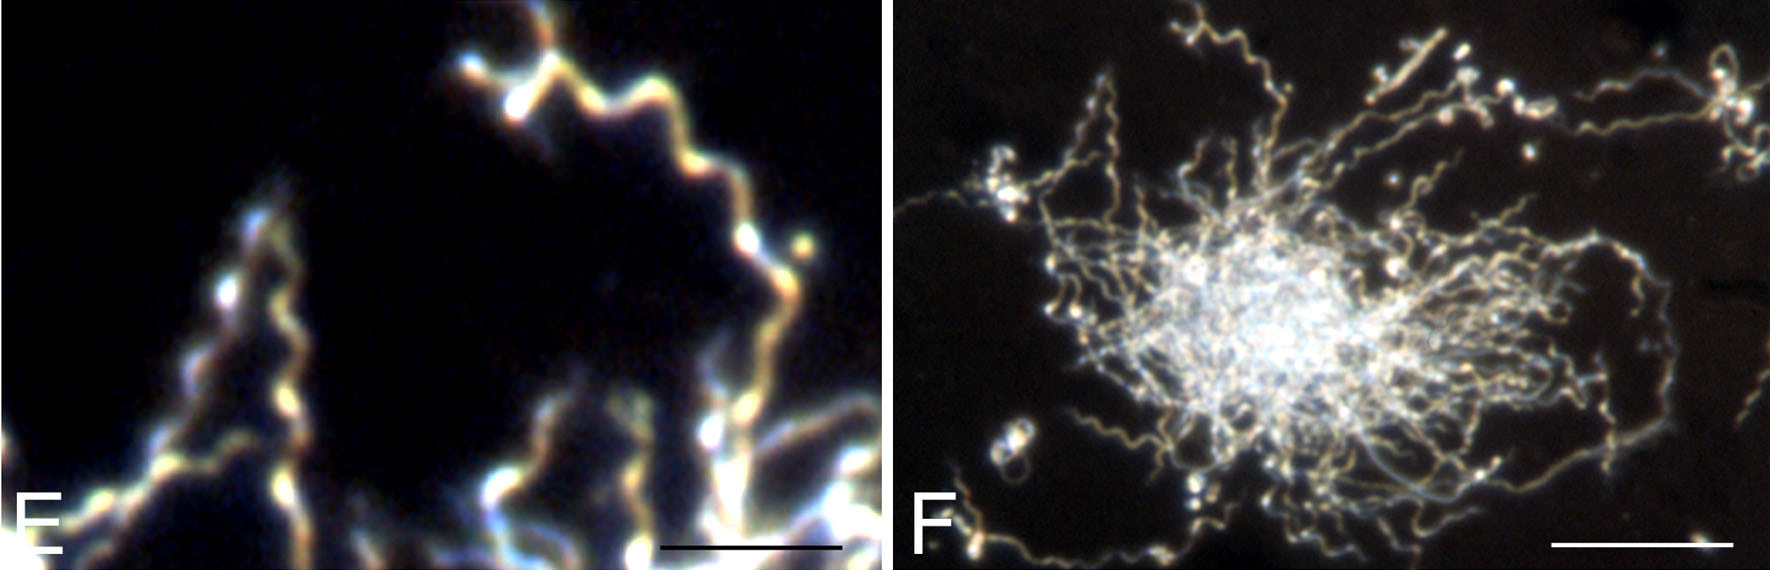
B. burgdorferi, causative agent of Lyme Disease, is captured in dark field microscopy here;By Judith Miklossy, Sandor Kasas, Anne D Zurn, Sherman McCall, Sheng Yu and Patrick L McGeer - Journal of Neuroinflammation 2008, 5:40. doi:10.1186/1742-2094-5-40. Figure 1. Online version, CC BY 2.0, https://commons.wikimedia.org/w/index.php?curid=19512537
|
Microsporum canis is a fungal specimen photographed in dark field microscopy;By Medmyco at English Wikipedia - Transferred from en.wikipedia to Commons., CC0, https://commons.wikimedia.org/w/index.php?curid=48280378
|
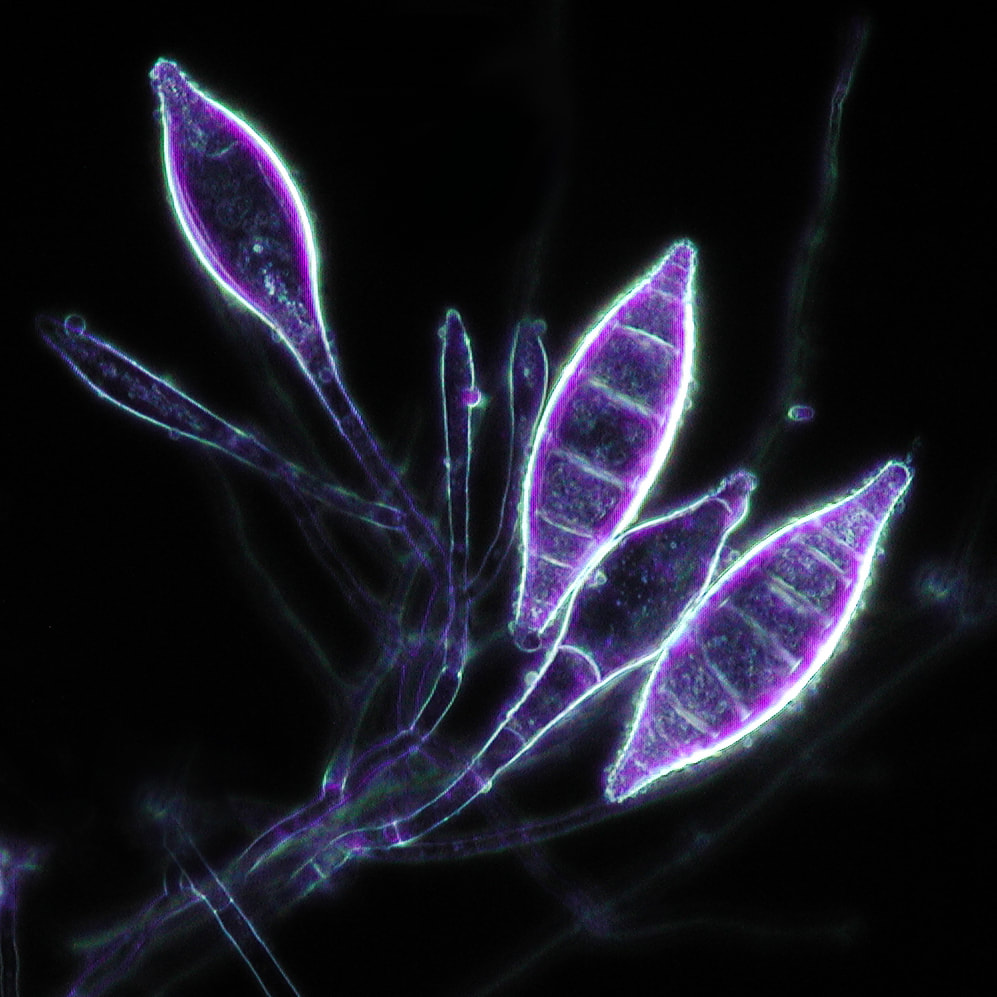
phase contrast microscopy:
Phase contrast microscopy uses some special optical lenses to change the refraction of light, causing the specimen to appear as dar against a bright background. This is useful in looking at cells that are transparent, such as some ova and parasites, as well as urine samples for casts and crystals.
https://upload.wikimedia.org/wikipedia/commons/2/2e/Phase_contrast_microscope_labelled1.jpg
|
By Egelberg, CC BY-SA 3.0, https://commons.wikimedia.org/w/index.php?curid=17913773
|
Trichomonas in phase contrast microscopy;https://upload.wikimedia.org/wikipedia/commons/2/27/Trichomonas_vaginalis_phase_contrast_microscopy.jpg
|

Epithelial cell in phase contrast microscopy;By Photograph taken by Spencer Diamond at the Biological Imaging Facility in Koshland Hall on the campus of UC Berkeley. - Spencer Diamond ©2007, CC BY-SA 3.0, https://commons.wikimedia.org/w/index.php?curid=7903392
|
fluorescence microscopy:
Fluorescence microscopy is used quite often in the microbiology lab, particularly in the mycology, parasitology, virology and mycobacteriology sections of the lab. It uses a fluorescent dye or tag that emits fluorescence when it is illuminated with ultraviolet light or special light filters. Sometimes various specimens naturally possess these fluorescent chemicals within so no dye is even needed.
Photo courtesy Jeanette Sprute, MT-AMT, M-ASCP, MS-Biology, Certified in Emerging Diseases, Certified Instructor; Candida albicans yeast cells stained in Calcofluor White Stain and viewed with fluorescence microscopy
the electron microscope:
The electron microscope uses a beam of electrons instead of light to create an image. Electromagnets act as lenses. The limit of resolution is improved by a factor of 1000, so it can magnify images much better than traditional microscopes. There are two types: Transmission electron microscope (TEM) and scanning electron microscope (SEM). The TEM is better in that it is able to slice through a specimen and capture a 2-D image of an ultra thin section since it has the ability to capture electrons that have passed through the specimen. Cellular organelles can be seen using this type of microscopy. SEM, on the other hand, just has the ability to scan the surface of a specimen and is used to make a 3-D image of the specimen's surface. A beam of electrons is passed over the stained surface of the specimen.
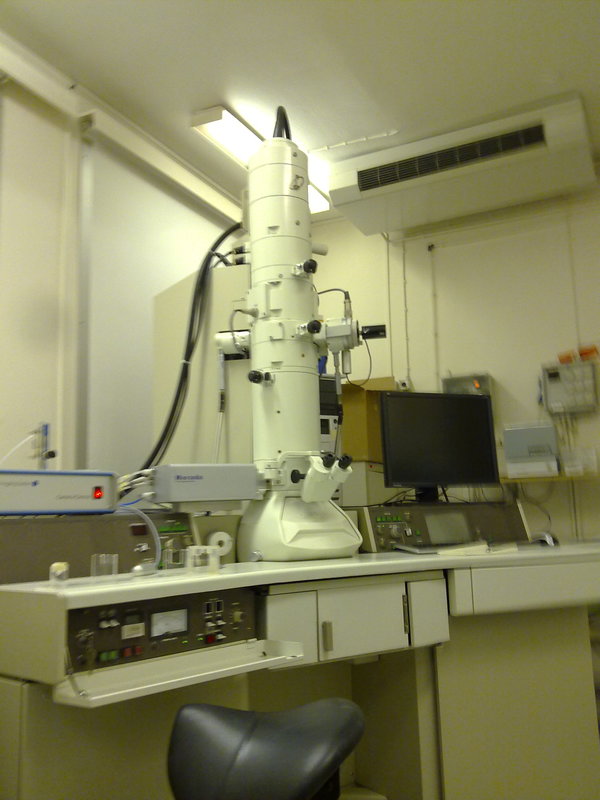
By kallerna - Own work, Public Domain, https://commons.wikimedia.org/w/index.php?curid=5768162
|
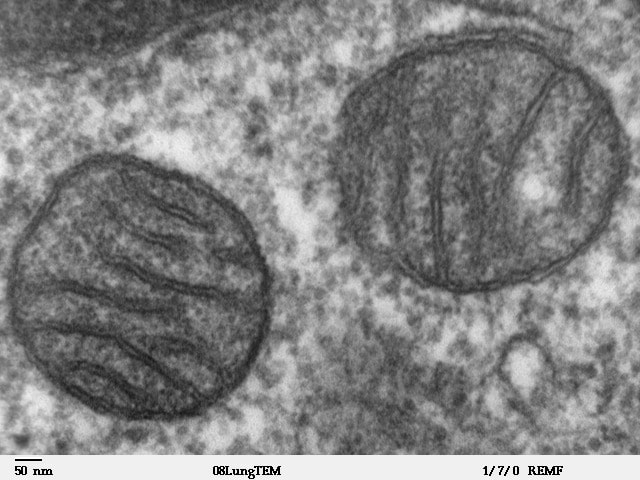
Mitochondria, imaged by a transmission electron microscope like the one seen on the image on the left;By Louisa Howard - http://remf.dartmouth.edu/imagesindex.htmlhttp://remf.dartmouth.edu/images/mammalianLungTEM/source/8.html, Public Domain, https://commons.wikimedia.org/w/index.php?curid=1248089
|
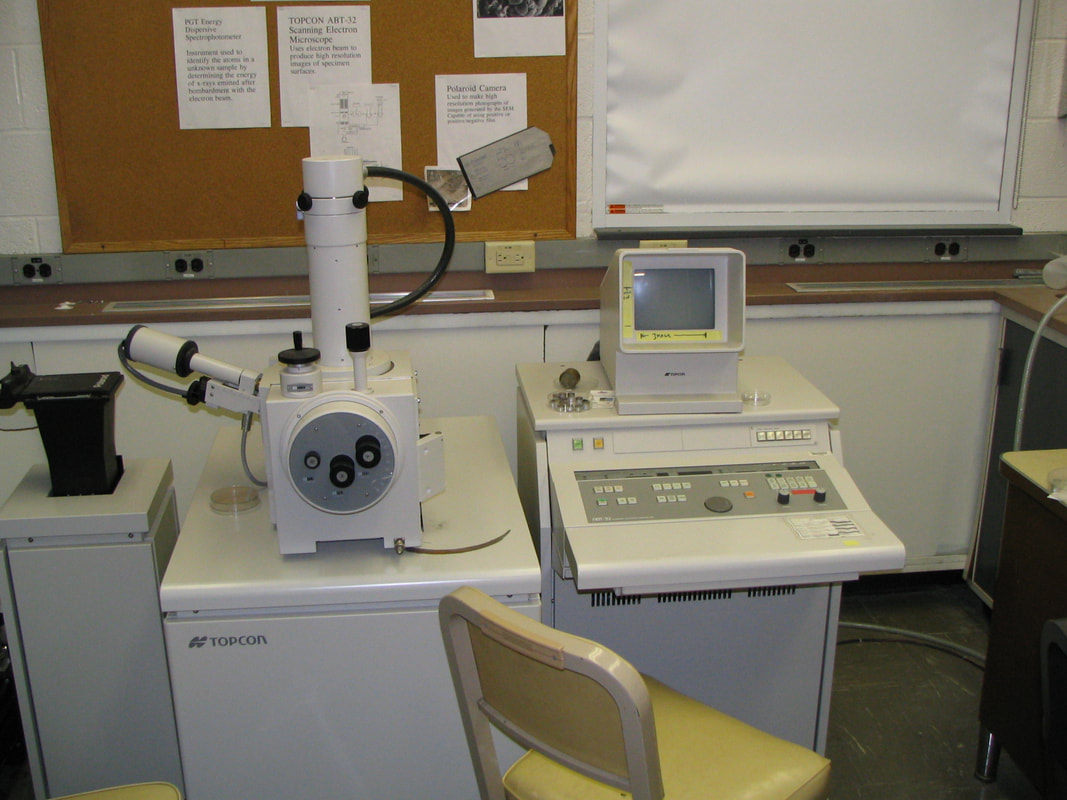
https://upload.wikimedia.org/wikipedia/commons/9/99/Scanning_Electron_Microscope.jpg
|
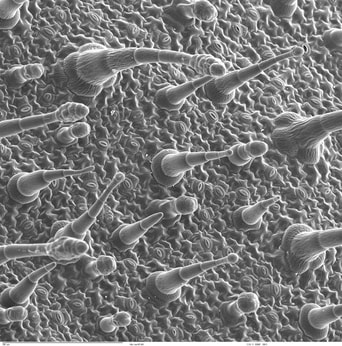
This is an image of the surface of a leaf taken by a scanning electron microscope like the one seen on the left of this image;By Louisa Howard (Dartmouth electron microscope facility) - http://remf.dartmouth.edu/images/NicotianaLeafSEM/nicotianaleafcatalog.html, Public Domain, https://commons.wikimedia.org/w/index.php?curid=4255028
|
